A lot of us are still struggling with their first few adventures. And those first adventures, even with the guides, can be a bit tricky to finish. Particularly because the guides can be somewhat daunting the first few times we look at them...
Like any new thing we need time to adapt and to become versed in its peculiar language.
The first time I used a map it was for Horseback - and I went straight for 1R blocks and the whole thing.
Suffice to say I made a mess of things. I still managed to finish the adventure but I must've failed at least 2 or 3 blocks there...
So, what I'm trying to do here is a brief guide on how to help you understand what the guide is talking about, so that you don't make the same mistakes as me.
And even if you do make mistakes... it's okay. We learn from them. In my opinion, in the long run, most of the mistakes made are due to lack of attention rather than lack of knowledge.
The second kind I can try and help but with the first kind... well, just keep your eyes peeled!
The guides we will be talking here will be Tage's guides. Because I think they are the best, the most thorough, easier to read and complete.
If you have troubles with any other map, drop me a line and I'll try and help (just bear in mind I might not be so skilled in them...)
KILLSTE: Collected Adventure Guides by Various Authors
Before we get into it there are a few things I want you to consider:
1 - How many Generals do you have?
2 - What kind of Generals do you have? (are they all Normal Generals? Or do you have Battle Hardened or a Veteran General?)
3 - What troops do you have available? Have you got Cavalry and Longbows and Soldiers?
4 - Will I attempt to do 1R (single) blocks? Round blocks? Both? Or none? (remember, each time you do a 1R block (successful or not...) your normal general will have to rest 4h... (special generals only need to rest for 2h - but you should never use them in blocks).
(5 - Do I have enough Generals to do this adventure?)
The answers to these questions WILL AFFECT which setups you can choose from...
Then, after you know which setup you would like to use you will have to consider also:
1 - Which troops do I have ready?
2 - Which troops do I need to build? (and do I have enough resources to do so?)
3 - Do I have enough population to be able to do the adventure in one go or not? Or do I have to keep building troops as I progress through the adventure? (which begs the question: will I have sufficient time to finish it?)
Let's start with an easy adventure: Lost Skull (click for map)
The guide starts with this info right below the title:
Average Losses (best version): 131R or 123R 3S
This doesn't mean that's the amount of troops you'll need. It's simply the "absolute" MINIMUM amount of troops required to finish the adventure. (so you may not have the necessary combination of units and generals to make this possible...)
Then you have the following info:
Adventure Info:
Player Level: 26+
Difficulty: 2/10
Number of Players: 1
Duration: 2 days
Where to get?: Adventure seek (Short or Medium) with Explorer
So, you have to be level 26 or above to be able to START this adventure.
The difficulty level tells us this is an easy one (only 2 difficulty out of 10).
It is also a single player adventure - and it lasts two days. This means you have 48h since the moment you click START to be able to finish it.
And we also know that both the Short and Medium Explorer searches will be able to find it for us.
After this:

we have:
with the note:
2100 of the XP come from completing subquests.
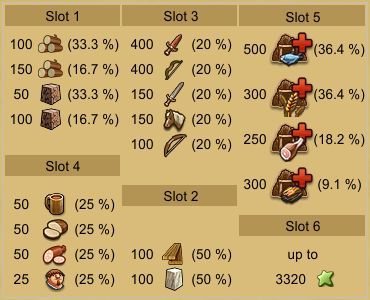
The image above gives you the PERCENTAGES of getting each of the various LOOT possibilities for each of the 6 loot SLOTS.
This means 33.3% of the times you will either 100 exotic wood or 50 granite in your loot slot 1.
And 16.7% of getting 150 exotic wood or 100 granite, also in your loot slot 1.
And so on and so forth up to slot 6.
6 portions of loot in total PLUS the XP.
And the note above: meaning that you will need to do other things during the adventure besides fighting enemy camps in order to get the full XP...
Next we have the adventure map:

You will see some numbers (1 to 4), letters (A to D) as well as G1 and G1...
Each of the numbers represents an enemy camp. As such, from this map we can easily see that there are only 4 enemy camps.
The G1 and G2, represent the positions your Generals will take - the Garrison positions.
The letters A, B, C and D, represent the location of 4 ruins that you will need to click upon in order to complete one of this adventure's subquests.
Now come some crucial pieces of information:
You need to send troops 3 times.
Six versions are presented below, with the following needed and lost troops:
One ANY general
- Units needed, average: 334R 184C (518 units)
- Units needed, maximum: 358R 184C (542 units)
- Units lost, minimum: 237R
- Units lost, average: 270R
- Units lost, maximum: 305R
One ANY general with Soldiers
- Units needed, average: 265R 140S 185C (590 units)
- Units needed, maximum: 283R 140S 185C (608 units)
- Units lost, minimum: 226R
- Units lost, average: 259R
- Units lost, maximum: 283R 1S
One ANY general with Elite Soldiers
- Units needed, average: 262R 141E 186C (589 units)
- Units needed, maximum: 279R 141E 186C (606 units)
- Units lost, minimum: 226R
- Units lost, average: 257R
- Units lost, maximum: 279R
One ANY general with Cannoneers
- Units needed, average: 235R 1M 1E 186C 140K (563 units)
- Units needed, maximum: 252R 1M 1E 186C 140K (580 units)
- Units lost, minimum: 201R
- Units lost, average: 230R
- Units lost, maximum: 252R 1M
One VETERAN general with Soldiers
- Units needed, average: 123R 196S 243C (562 units)
- Units needed, maximum: 138R 196S 243C (577 units)
- Units lost, minimum: 106R
- Units lost, average: 123R 3S
- Units lost, maximum: 138R 5S
One VETERAN general with Elite Soldiers
- Units needed, average: 123R 3S 197E 244C (567 units)
- Units needed, maximum: 136R 3S 197E 244C (580 units)
- Units lost, minimum: 106R
- Units lost, average: 123R 3S
- Units lost, maximum: 136R 3S
Each entry represents a troop setup that will enable you to successfully complete the adventure.
Also notice that the various setups are ordered in regards to the type of generals you have as well as unit types. First normal generals, then special generals. First all unit types up to Soldiers. Then with Crossbowman. Then with Elite Soldiers. (then with Cannoneers)
Notice that the various setups are COLOUR CODED. So, if you are ONLY using ANY (Normal) GENERALs...
you have 4 different setups:
- with cavalry and recruits
- with cavalry, recruits and soldiers
- with cavalry, recruits and elite soldiers
- with cavalry, recruits and canonneers
More likely than not it will be the first two that you will be using:
One ANY general
- Units needed, average: 334R 184C (518 units)
- Units needed, maximum: 358R 184C (542 units)
- Units lost, minimum: 237R
- Units lost, average: 270R
- Units lost, maximum: 305R
One ANY general with Soldiers
- Units needed, average: 265R 140S 185C (590 units)
- Units needed, maximum: 283R 140S 185C (608 units)
- Units lost, minimum: 226R
- Units lost, average: 259R
- Units lost, maximum: 283R 1S
Do notice that Tage (the guide's creator) tells you how many units you need on average as well as the maximum number of units you may need AND the minimum, average and maximum losses you can have for each of the setups.
(if all goes according to plan that is... and if you follow the guide thoroughly - and pay attention to any lag - it will)
(most of the problems I have seen people have with these guides stem from the simple fact that they haven't followed the instruction to the letter: using a different general, forgetting to assign troops to the general sent, skipping attack waves, misplacing Garrisons, sending troops either too late or too soon during blocks, using the wrong troop setup and, simply being distracted...)
Also notice the losses. Using Soldiers mixed with Recruits you reduce the average recruit losses from 270 to 259 (11 recruits saved on average) - with the faint possibility of losing a single soldier on the rare occasion.
This means you should preferentially use this setup and save up a few recruits. It also means that even though it may cost you a lot to build 140 soldiers - you're not likely to lose even a single one of them: so they can be used for future adventures.
In fact this is what happens with many of the guides: they require many units but the losses are geared in such a way that you lose cheaper units and save (reasonably so) the most expensive ones as much as possible.
Usually Cavalry (Wild Mary's the obvious exception - with 466 to 578 cavalry losses!) and Longbowmen are not to be lost. On a few adventures you might lose some Soldiers or Militia but, even so you will only lose a small amount of them. So most of the expensive units you build you end up using time and time again! It pays off that initial investment of time and resources.
[NOTE (thanks to Tage!): there are quite a few more adventures where cavalry will need to be sacrificed e.g. Old Friends (65C), Motherly Love (328-352C), Sons of the Veld (220C), Victor the Vicious (160-259C), and finally Dark Brotherhood (1000C!)]
So, this is what we will need to have to successfully complete this adventure with our Normal Generals:
Units needed, average: 265R 140S 185C (590 units)
Next we have:
Game flow, garrison settings and losses (minimum - average - maximum):
 Garrison Position G1 (Camps 1 and 2)
This mini adventure includes three subquests, each giving you an immediate reward of 600 XP:


Camp 1) 80 Deckscrubbers, 120 Knifethrowers
ANY general: [16R 184C (12R - 14R - 16R)]
ANY general: [14R 1S 185C (12R - 13R - 14R)]
ANY general: [13R 1E 186C (12R - 13R - 13R)]
VETERAN general: [6R 1S 243C (4R - 5R - 6R)]
VETERAN general: [5R 1E 244C (4R - 5R - 5R)]
Please see here that you have the place where you need to place the Garrison marked as G1. There is also an arrow indicating the attacks to be made. It's in RED meaning this attack is a conquering attack - ie, not a distraction attack (or block).
(when there are arrows representing blocks, their colour is ORANGE instead of red)
Below the image there is another note giving us some more information in regards to one of the various subquests we are required to do on this adventure.
And, below that we have the enemy setup for the first camp as well as the various options of allied setups.
So,
Camp 1) 80 Deckscrubbers, 120 Knifethrowers
is what we are going up against.
But now we need to remember which option did we pick initially. We said we only had Normal Generals, remember?
So it's one of these:
ANY general: [16R 184C (12R - 14R - 16R)]
ANY general: [14R 1S 185C (12R - 13R - 14R)]
ANY general: [13R 1E 186C (12R - 13R - 13R)]
You will notice the first setup only has Recruits (R) and Cavalry (C)
The second has Recruits (R), Soldiers (S) and Cavalry (C)
and the third has Recruits (R), Elite Soldiers (E) and Cavalry (C)
We don't have Elite Soldiers yet but we want to save as many troops as possible. So we're going to go for the second setup:
ANY general: [14R 1S 185C (12R - 13R - 14R)]
The info between straight brackets gives you, respectively, the minimum, average and maximum number of losses to be expected.
So, for this first attack on camp 1, with 80 Deckscrubbers and 120 Knifethrowers, we will use a combination of 14R with 1S and 185C assigned to our Normal General. And we should expect to lose between 12 and 14 Recruits.
And the same happens for the second camp:

Camp 2) 80 Caltrops, 120 Deckscrubbers
ANY general: [200R (40R - 51R - 62R)]
ANY general: [60R 140S (40R - 51R - 60R)]
ANY general: [59R 141E (40R - 51R - 59R)]
ANY general: [59R 1E 140K (40R - 51R - 59R)]
VETERAN general: [54R 196S (39R - 47R - 54R)]
VETERAN general: [53R 197E (39R - 47R - 53R)]
This is the option we will pick (according to our initial assessment and decision):
ANY general: [60R 140S (40R - 51R - 60R)]
Then Tage gives us some more info about the subquests:
Explore the Ancient Ruins (A, B, C and D)Before moving on, and unless you have already done so, find all ancient ruins and explore them
(click on each of them so that they disappear).

This subquest will give you an extra 300 XP.
And we move, with another map, for the last two camps:
Garrison Position G2 (Camps 3 and 4)

Camp 3) 60 Caltrops, 140 Saberrattlers
ANY general: [200R (58R - 69R - 80R)]
ANY general: [75R 125S (56R - 67R - 75R 1S)]
ANY general: [74R 126E (56R - 66R - 74R)]
ANY general: [70R 1E 129K (52R - 61R - 70R)]
VETERAN general: [65R 185S (50R - 58R - 65R 1S)]
VETERAN general: [65R 185E (50R - 58R - 65R)]
Camp 4) 1 Crazy Cook, 80 Gunmen, 20 Petty Officers
ANY general: [200R (127R - 136R - 147R)]
ANY general: [134R 66S (118R - 128R - 134R)]
ANY general: [132R 68E (118R - 127R - 132R)]
ANY general: [110R 1M 89K (97R - 105R - 110R 1M)]
VETERAN general: [13R 5S 232C (13R - 13R 3S - 13R 4S)]
VETERAN general: [13R 3S 2E 232C (13R - 13R 3S - 13R 3S)]
VETERAN general: [11R 6M 1E 232C (11R 2M - 11R 5M - 11R 6M)]
VETERAN general: [20R 3E 227C (15R - 19R - 20R 12C)]
Clearly here we will pick for camp 3 also the camp composition also with Soldiers:
ANY general: [75R 125S (56R - 67R - 75R 1S)]
And similarly for camp 4:
ANY general: [134R 66S (118R - 128R - 134R)]
At the very end Tage also reminds us of the following:
All garrison setups have been simulated at least 5000 times, using this simulator.
Even if I do the utmost to ensure that no errors occur anywhere, I am only human, and errors might always appear.
Thus, I do recommend that you double-check all setups in the simulator, especially before trying an attack the first time in a newly published setup.
All garrison setups where recruits and soldiers are included have a very small chance of one or a few soldiers being killed.
I prefer having it so tight, that in most cases that one soldier survives and actually might save one recruit by taking the last hits in the battle.
That being said, be prepared to lose the odd soldier(s) after playing the same adventure hundreds or thousands of times...
On the other hand, all garrison setups have also been made so that the risk of losing longbows or crossbows is next to negligible.
Due to this, some setups have more recruits/soldiers than what can be seen in other guides.
In some cases this will increase the maximum losses (of recruits), but save the rare occasion of losing crossbows.
I hope this has clarified you a bit in how to read an adventure guide.
If it hasn't - or if you would like to see a similar post for an adventure with blocks - just let me know and I will try to do so.
Now that you have selected how you are going to play this adventure, you need to gather the necessary resources for it, build troops, etc. Then, you go to the adventure you have in stock, activate it, load up the generals with troops and send them over. As soon as everything you need is on the island, you can start taking down those enemy camps.
A final note: you can offload every single troop onto an island and send all generals back at the same time to go and get more - don't worry, when you get back with more troops, all those that you have left behind will still be there, ready to be assigned and get in action!
Big THANKS! to Tage for creating such wonderful guides, and for taking the time to read through this and point out a couple of corrections!
Happy Adventuring!