Friday 6 December 2013

Outstanding Setups! Fisherman! (s3)

Hey peeps,

Welcome to a new series of posts about great production setups. The aim here is to examine places where you maximize the efficiency of your buildings.

We are following some very broad rules here - that you may disagree with.

The first rule is that we are trying to save the large areas for farms, silos and wheatfields since this production takes up a lot of space.

The second rule is that we are playing with the so called ortogonal building placement as it is the most efficient in most cases.

The third rule is that we will try and use awkward areas whenever possible to build solid production lines. (the fisherman setup in S3 is a good example of this, you will see it below).

A fourth rule is that we will try and use Improved Storehouses when possible as a means of saving licenses.

This first example follows all of the above rules. It doesn't use a large open area, it uses the ortogonal placement and it is located in an awkward area. But we provide here with two alternatives for you. One with the Improved Storehouse, another with a regular Storehouse.

The times, and therefore the production, is slightly better with the regular Storehouse. Essentially, in the 6 buildings shown around the storehouse, you have 8 seconds more overall production time for the Improved Storehouse setup than for the regular storehouse one. Even if you had all buildings at level 5, buffed twice a day with Baskets you'd only be producing about 120 fish more per day with the regular Storehouse setup.

This first screenshot is for the Improved Storehouse setup - courtesy of Nedrakus! You can thank him, because he was the one who found it! (even though he was tweaking my own setup... that I had conjured up from looking at other peoples islands... no real originality here, I know... :p) We don't have the Improved Storehouse in place just yet - but you can see that the space is there for it ;)


Approximately 5,967 fish per 12h (unbuffed, with six level 5 fishers)

This second screenshot is for the regular Storehouse setup. I did it on the Test Server. I wanted to check if times were better with a regular Storehouse - and they are, just not by much. So this is me tweaking Ned's setup that was the tweak of mine.. etc...


Approximately 6,002 fish per 12h (unbuffed, with six level 5 fishers)

If you are running out of fish or have your fishers a bit scattered and want to have only one deposit being used... this is a good place to try.

If you have a better setup than this - let us know! If it really is better - or simply a good alternative - we will post it here also ;)

Happy fishing!

Thursday 5 December 2013

Incoming! Christmas Event! Treasure Searches!

Hey peeps,

Next week after maintenance the Christmas Event should start. There have been a couple of new Dev's Diary about this:

Christmas Event 2013

Special Shop Items

Do check them out if you can.


In any case, what I would like to tell you now is a bit about the research we did at the test server in relation to treasure searches.

We built a spreadsheet and we asked people to fill in their results in hopes of getting an idea of which Treasure Search yielded the most presents.

As expected the VERY LONG searches give the most presents in one go (up to 50 presents each time). But if you actually calculate the number of presents you get by search hour then it's the SHORT SEARCH that beats the odds.

Here is some data (for normal scout search times - no upgrades)
Search typePresents per hour
Short0.5723
Medium0.4000
Long0.4231
Very Long0.3030

This means, on average, we get 0.57 presents per hour of short searches, versus the 0.3 presents per hour with very long searches.

These numbers may or may not change when things start here on the live servers. This is what we found back at the Test Server.

Still, it seems a good way to get Presents!

For the more curious ones here are the number of searches we did:
Search typeNumber of Searches
Short83
Medium75
Long65
Very Long66
Also, if your scouts are fast and you have treasure hunting special abilities unlocked you may get some better numbers than this.

Here's a few screenshots:

Medium Search


 Medium Search


Long Search


Sunday 1 December 2013

Copper Smelters, Toolmakers and Bronze Weaponsmiths

Hey peeps,

Here is my current setup for my 5 Copper Smelters, 3 Toolmakers and 3 Bronze Weaponsmiths.


As you can see this setup isn't perfectly balanced as there is one Copper Smelter missing. In it's place there is a Stone Mason that will be in the near future destroyed to give room to said Copper Smelter. Still it is a setup that works quite well in this transition shape since i keep some of the Copper Smelters buffed once a day or so - I find it is enough to keep it running smoothly.

Here's a list of things you may want to have a look at:
1 - Each Copper Smelter is positioned in exactly the same slot relative to its Storehouse as are the Toolmakers and Bronze Weaponsmiths to theirs.
2 - I am upgrading one Copper Smelter and one Toolmaker at the same time- as to minimize unbalancing the production too much (one less consuming, one less producing)
3 - I am using only the fast slots in these Storehouses (6secs and 8secs slots) since I want these specific production buildings to produce as much as possible (I use a lot of Tools and Bronze Swords and I do not want to have loads of Toolmakers and Bronze Weaponsmiths - just a few but at level 5, running buffed as much as possible).
4 - I am using this area behind the Mayor's House to do this since it is not a good area to place Farms and Silos. It is also an area not needed for Wood production. Farms and Wood production are the two things that require the biggest sprawls in area in order to have good production values.
5 - The whole setup is marked with roads. In fact my whole island is "gridded". I did this because I wanted to know where best to place things. So, you can use roads to create the places where you intend to place the buildings before you put them there. In this way you can see beforehand if you do actually have the room for everything you had planned or not, without wasting resources moving things there only to find out your setup doesn't have enough room.

I will try to post more stuff like this in the near future.

Happy Settlering!

A Few Tips About Levelling Up

Dear friends,

We start playing a game and, surely, part of the fun is to level up quickly, to reap rewards, to grow stronger to to speak. Right?

It is usually so - but TSO (The Settlers Online) is a game about consequences. Everything is tied in to pretty much everything.

What does this mean?

It means that it is important to be careful when leveling up. My aim here is to examine the two main consequences:

1 - Leveling up your Player Level.
Usually when you level up you don't feel so much difference between the tasks you were given in the previous level and the current one. This is because there are "marker" levels so to speak that herald a new phase (a more costly one) in your gaming.

When you reach level 36 your Guild Quests and Daily Quests and even some Event Quests (the special events that occur a couple of times of year, typically) become a bit harder. You start having to do adventures regularly for GQ and they show up on your DQ as well. In order for you to do this with some ease your economy needs to be somewhat balanced and efficient (even if you are buffing it to keep it going ;) ).

The next step is level 46, and level 46 is really a game changer. Your GQ's and DQ's become quite hard, having to do adventures like Black Knights, Dark Brotherhood, The Nords and so on. You may even have the troops to do them - but they are costly to buy, lootspots are costly to buy and even if you're sending your explorers in medium or long searches, they are not easily found. Your economy needs to be solid at this point for you to be able to tackle them. At this level perhaps the best strategy is if guildies team up to tackle these 2 and 3 player adventures as a combo. Perhaps one guildie has found one through explorer searches and can give the lootspot to someone else. Otherwise you will be stuck with an adventure whose lootspot may cost around 1k or 1.5k coins to purchase. So level 46 is a tough one to get into and, as soon as you do, you're there for keeps...


2 - Leveling up your Production Buildings.
This is something we all do regularly because, after all, we all want those shiny level 5 buildings, right? The problem with this is that our leveling up may be something like: "hey, I need more bread to build settlers and adventures... I know what I will do, I will level up my bakeries." And then you level up your bakeries and suddenly they stop working because they have run out of flour. And then you realize you need to level up the flour mills as well. The problem is you haven't got the resources to do it since you've used them all on the bakeries. So, you find your way around this: you start buffing the mills. The problem with that is that you start running out of buffs as well - that you need to buff other stuff... So you level up a Butcher - only to find out your meat production is now in the red and you need to buff the Hunters too...

You see where this is going. If you level up buildings without looking at your economy overview, without planning it a bit... you may be heading for trouble. After all the aim of leveling up a building is making things more efficient and easy, right? But, as it turns out, it should also make you need to be a bit more careful.

A good thumb rule is to level up production buildings from the bottom of the chain up. The problem with this strategy is that you know it's gonna take a lot of time. But, my friends, this is TSO: time is the name of the game...

Another thing you can do is to level up things in clusters. So you level 4 farms, 2 mills and 1 bakery (and keep things balanced) - rather than leveling ALL the farms, then ALL the mills, then ALL the bakeries.

Have a think about what you have, what you want to have and what is required to make that jump - both in terms of the initial investment (the resources needed to push those level up buttons...) and the long term commitment (the input resources needed to keep those buildings actually operating smoothly at their new level).

So, we can sum all this up into two tips really:

1. At level 36 and level 46 GQ's and DQ's become substantially harder. Perhaps speak with other players  before you collect all that loot and XP to evaluate if your economy is ready for it.

2. Use the Economy Overview to plan ahead your leveling up of production buildings, so that you don't get stuck with missing resources to keep them working!

I hope this helps!

Friday 29 November 2013

A Few Tips About Farms And Silos Placement

Replacing wheatfields can be a bit tiring after a while so, if you have the coins or the gems you may well consider buying some silos and perhaps stop altogether replacing wheatfields.

But how best to place them?

Well, the strategies are many. I will try to post here a few - but I will start with the one I have found, perfectly balanced and with a very decent wheat production rate. The pic you see is taken in S7. As you can see farms and silos are symmetrical to one another as relative to the storehouse. This ensures that the travel times are exactly the same for both. The wheatfield right below the storehouse is also the best placement I could find, ensuring the neighbouring farms and silos don't have to travel too long to get there.


More setups will be added here with some comments as soon as I have time to screenshot them and write some blurb about them! ;)

Hope this helps!


Another Tip About Cauldron Hunting

Hey peeps,

Thanks to Rinswinth, if you wish to gather twice the amount (if it's a two player adventure) or triple the amount (if it's a 3 player adv) of cauldrons now you can!

The idea is very simple: all payers click on the same cauldron at the same time.

This will send a parcel of loot per player, per cauldron.

The tricky bit then is to time it, right?

Well, not so much... simply send a garrison and use it as a timer! I have found that when the garrison is building, when you reach 100%, you can all click on the cauldron and get extra loot!

To do this, of course, you will have to send a general (you don't need to load up with troops). If you're in a hurry you best send your fast general! In any case do remember to check first if the adv does have some cauldrons in there...

A simpler way to do it (thanks again for this one Rins!) is to simply go on Global chat tab and write "go" or "now" there - as all players will see it and they can pick their cauldrons at the same time ;)

I have tried it and it works - just takes a bit more patience and time if you're really keen on going for those caudrons ;)

Happy hunting!

Guild Quests List

Hey peeps,

Thanks to Laslord we can all now see which Guild Quests we are all supposed to do per level. This is a forum post that Fexno and others have been compiling. As such it is not yet complete and the information therein is likely to keep being updated. Still it is a great help in clarifying who has to do what.

Remember, our guild is currently 83 members strong and, as such you need to look at the 56 - 100 members link.

I will also post this link under Important Links.

Click for the Guild Quests Guide.

Hope this helps!

Thursday 28 November 2013

Incoming! Christmas Event! Christmas Event Quests!

Hey peeps,

This is perhaps the last post about the upcoming Christmas Event. Once again may I remind you all that the info contained in these posts is taken from the Test Server - the actual event may differ significantly from what's presented here. ;)

The Christmas Quests are all (as far as I have seen) quite easy to complete and they essentially serve the purpose of showing you a bit how the event works and what you need to do. It seems also that we will have a daily Christmas quest to do for perhaps a standard of 10 Presents reward each. I will try and login on the Test Server everyday and slowly compile their list here.

Here is the list of quests I have found, along with requisites needed to complete and rewards obtained upon completion.

EVENT QUESTS:

Main Quest One: The Advent Calendar
Quest Title: It's Christmas Time
Task: Open the Advent Calendar window.
Reward: 20 Presents

Main Quest One: The Advent Calendar
Quest Title: Getting Started
Task: Reach Level 16
Reward: 20 Presents

Main Quest One: The Advent Calendar
Quest Title: Bells, Candy and Gingerbread
Task: Own at least 25 Christmas Bell. Own at least 25 Candy Cane. Own at least 25 Gingerbread.
Reward: 20 Presents

Quest Title: A Basket Full Of Presents
Task: Produce a Basket of Presents at the Mayor's House. (this takes 1h to produce - but you can pay 30 gems for the instant complete).
Reward: 20 Presents

Quest Title: Searching For Presents
Task: Earn 1 Present through Short Treasure Search
Reward: 20 Presents

Quest Completion Reward: 100 Presents


A total of 210 Presents can be obtained from doing these quests - not counting the 10 Presents you have built by completing the A Basket Full Of Presents Quest. ;)


Main Quest Two: Reindeers Missing
Quest Title: Practice Makes Perfect
Task: Reach Level 23.
Reward: 20 Presents


Main Quest Two: Reindeers Missing
Quest Title: Replacement Reindeers
Task: Pay 200 horses from storage. Pay 600 Pinewood (logs) from storage. Produce 200 horses. Produce 600 Pinewood (logs).
Reward: 20 Presents


Main Quest Two: Reindeers Missing
Quest Title: Horses Can Fly!
Task: Pay 20 Herbs from Storage. Pay 1 Kettle from storage. Pay 300 water from storage. Pay 200 brew from storage.
Reward: 20 Presents


Quest Completion Reward: 100 Presents


Quest Title: Important Wood
Task: Produce enough used Longbows to obtain 10 Longbows. (this is done in the Provision House for those of you that don't already know)
Reward: 10 Presents

Quest Title: Christmas Postcard
Task: Buff at least 5 of your friend's buildings using Aunt Irma's Gift Baskets
Reward: 10 Presents

Quest Title: Help for Mother Holle
Task: Pay 50 sausages from storage.
Reward: 10 Presents

Quest Title: Heavy Gifts
Task: Pay 250 horses from storage.
Reward: 10 Presents

As you can see all these quests are quite easy ;)

Incoming! Christmas Event! Rarity Provision House!

Hello everyone,


The Rarity Provision House is a new building (that perhaps will only be available during Christmas Event for purchase) that will allow you to produce 4 new buffs. Some of the info about them is still missing but I will share here what I found in my test server journey. At this point we do not know if more buffs will be added to it in the future.


Magical Ink (to be applied on Mayor's House)
Cost: 200 simple paper + 150 intermediate paper + 40 nibs per buff produced
Buff building duration: 10 minutes per buff
Characteristics: apply on Mayor's House to obtain 50 Map Fragments.
Buff Production Cost: around 30 coins
Current Buff Value: 225 coins
Advice: if these stats stay as they are, this buff is well worth doing - and may well drop the price not only in map fragments but also in the TO prices of some adventures ;)


Employee Of The Month Badge (production building triple buff)
Cost: 300 Hardwood Planks + 300 Marble + 50 Gold Ore per buff produced
Buff building duration: 30 minutes
Characteristics: This a triple buff (3x) that will last for 6h - so the same duration as a regular basket, but with 3 times output. If you are buffed with it by a friend it is likely the duration will increase the usual 50% (meaning it will last 9h). And if that friend has premium active it should last 9h50m - or thereabout. to be applied on usual production buildings.
Buff Production Cost: around 35 coins
Current Buff Value: 87 coins (half the duration of Exotic Fruits Basket, so I assume it's half it's price as well...)
Advice: This might be something well worth producing - either to use on coinages, gold towers, advanced papermills, ornamentalsmiths and fairytale castels OR to simply sell on TO. Still, it is to be expected that on the first few days, the prices of marble, hardwood planks and gold ore to perhaps climb a bit... The fact that people will be able for the first time to mass produce a triple buff is likely to bring down somewhat the prices of all triple buffs though...

Gamekeeper Snack (meat deposit buff)
Cost: 40 Bread per Buff
Buff building duration: 12min30secs per buff
Characteristics: to be applied on a meat deposit, giving +500 meat per buff.
Buff Production Cost: around 1.08 coins per buff.
Advice: Well worth producing if these stats remain as it will be cheaper to produce 1 Gamekeeper Snack than 5 Musk Deer Fragrance (with a total cost of 1.75 for 500 meat deposit this way).


Fisheggs (fish deposit buff)
Cost: 120 fish + 80 water per buff
Buff building duration: 2min30secs per buff
Characteristics: to be applied on a fish deposit, giving +500 fish per buff.
Buff Production Cost: around 1.4 coins per buff.
Advice: Slightly more expensive to produce than the original Fishfood. 500 Fishfood would cost us 1.35 coin. So probably only worth producing if your Provision House is too full with stuff being built - or if you're in a hurry! Still, these stats may well change as soon as this building becomes available on our server. Everything is still being tweaked at this point - sometimes with drastic changes!

Happy Christmas Event!

Read Christmas Event Post 1 - Collectibles!

Read Christmas Event Post 2 - Merchant Shop Items!

Read Christmas Event Post 3 - Advent Calendar!

Read Christmas Event Post 5 - Christmas Event Quests!

Read Christmas Event Post 6 - Christmas Treasure Searches!

Wednesday 27 November 2013

Incoming! Christmas Event! Advent Calendar!

If you don't know what an Advent Calendar is you will during the Christmas Event in Settlers Online. This quest is located above the quest book and represented by an arrow with a star on its tip. It will last 24 days and it's quite easy to do. We need simply to login every day, click on the quest and then click on the door that can be opened that day - and get a present!

And, every few days, a special door opens with a selection of special items that you can choose from (but one and only one of the options presented...)


Also it seems that if we are very good and open one door every day, on the very last we may just get the famous Gold Tower! This had up until now only been available to players that have traded or adventured enough to get the fairytale loot needed to purchase it from the shop ;).

But if you have skipped a door-opening-day fear not! You can still pay 20 gems and open the door you missed out on. Even if you don't get great loot - you will be making sure you get the Gold Tower at the end.
When you click on a door, the loot therein is displayed and automatically sent to star menu. It's an easy enough quest and some of the gifts to be had are quite nice indeed.

Besides, this is a really nice idea, giving people free loot and encouraging them to join the game every day. Hopefully the Christmas Event will be even busier and more successful than the Halloween one!

I will post here the loot I have obtained so far through the various doors. I will try and update this as more doors become available (we cannot open the doors ahead of time on the test server):

Day 01 -  100 fish
Day 02 - 150 copper ore
Day 03 - 200 fish
Day 04 - 300 advanced paper
Day 05 - 100 moveable type

Day 06 - 5 manuscripts/3 tomes/1 codex

Day 07 - 10 Presents
Day 08 - 100 meat
Day 09 - 200 tools
Day 10 - 150 meat
Day 11 - 350 intermediate paper

Day 12 - 500 magic beans/350 star coins

Day 13 - 150 nibs
Day 14 - 40 Presents
Day 15 - 150 iron ore
Day 16 - 300 map fragments
Day 17 - 400 intermediate paper

Day 18 - 2 Rabbit Lucky Charm/4 Red Flying Settler/2 Fermentation Accelerator/3 Gold Rush

Day 19 - 200 Book Fitting
Day 20 - 300 Saltpeter

Day 21 - 2 Bookbinding Glue/2 Chocolate Rabbit/2 Mr. Myers/2 Training Overtime

Day 22 - 400 Exotic Wood Logs
Day 23 - 50 Presents

Day 24 - Silo/Watermill/1 Premium Day


GOLD TOWER!!


Enjoy!

Read Christmas Event Post 1 - Collectibles!

Read Christmas Event Post 2 - Merchant Shop Items!

Read Christmas Event Post 4 - Rarity Provision House!

Read Christmas Event Post 5 - Christmas Event Quests!

Read Christmas Event Post 6 - Christmas Treasure Searches!

Incoming! Christmas Event! Merchant Shop Items!

Hi!

EDIT:
The number of Recycling Manufactories available for purchase has been increased to 2 and, correspondingly, the number of Deerstalker Huts has been decreased to 2 as well. It is likely that the prices for these will be changed as well when they hit the live servers.

This is the second post on all things related to the incoming Christmas Event. Today we are going to look at what will be on offer at the Merchants with a few tips on what may or may not be advisable to get. I am looking at these items purely from a production value perspective - so you won't see me saying to buy any decorations!

As always the way you choose to play is your own - that's part of the fun!

There are many items for sale during Christmas Event in exchange for Presents. For this reason it is best you start saving those gold coins now!

Here's is the list of items for sale on Test Server:

BUILDINGS:
2x Recycling Manufactory - 295P (P = Presents)
If you don't have one... get it! It produces coal without using any pinewood logs! Trust me, levelling one of these to 5 close to a storehouse is a very good investment. Even if you have coal surplus now... get one. These cannot be bought on TO and they are rare to come by. Even for gems you can only get one of them so... this is the best buy for me!


2x Deerstalker Hut - 595P (each)
These buildings produce Meat withouth the need of a meat deposit. So they are pretty much to Hunters what Recycling Manufactories are to Coking Plants. The big difference is: whilst the Hunter cycle is 6 minutes of production plus travel distance - with Deerstalkers the cycle is 8 minutes plus
travel distance. Which means you can't simply replace 3 Hunters for 3 Deerstalker Huts... you'd need a fourth Deerstalker for that to happen. Still, these are very good buys in my opinion - even if the building and placement of meat buffs can be a bit time consuming.


1x Rarity Provision House - 945P
I will do a longer post about this one as there are several things to be mentioned. Suffice to say there are 4 new buffs that can be produced here. At the time of this writing some of the details about these buffs still haven't been released. I hope in a coming post I will be able to cover those. Still, it seems this should be an item to get anyway!


Arctic Iron Mine - 245P (as many as you want...)
Placing this building on top of an iron deposit gives you a cool looking, ready to use, level 5 iron mine. The only problem with it is: if you let the mine collapse - you lose the great looking building... so you will have to buy a new one. For this reason I only recommend this building to those bent on doing some serious iron mining - and willing to acquire the much needed deposit refills that such a mine will require.


PRESENTS:
100 Gems - 30P
You can buy 30 Presents instantly if you are willing to part from those hard earned gems of yours...
300 Gems - 100P
Definitely a better deal... for more gems!

ADVENTURES:
More Secluded Experiments - 100P
This is one of the 2 new Christmas special adventures. I have no details on their contents whatsoever but, as soon as there is a link to a guide I will try and post it here so you can see what you'll be going up against...
I think these special Christmas adventures will yeild beans and so on (so fairytale advs loot) for all that choose to do them. If they also give Presents as loot (would be great!) is unknown.

Return To Bandit Nest - 100P
is the second Christmas special adventure. Same as before I will try and post here more details as soon as I have them.

Save The X-Mas Feast - 95 gems
A special Christmas adventure.

Stolen Sleigh - 95 gems
A special Christmas adventure.

BUFFS:
Hot Lemon Tea Buff - 60P
This gives you 3x output from a production building during 24h. Perhaps more if you are buffed by a friend (36h).
Christmas Feast Buff - 60P
Effect: 6x output for 2h.
Cookies - 80P
Effect: 3x output for 32h
Fermentation Accelerator - 60P
Effect: 4x output for 24h only on Brewery or Friary

DECORATIONS:
A Thousand Snowflakes
Effect: Covers the island with snow.
Small Christmas Tree
Christmas Tree
Snowman
Solar Flare
Effect: Removes snow from island


From this list it seems to me the first few items are the best ones to get (Recycling, Deerstalker Huts and Rarity Provision House). Not sure about the buffs and, more importantly, the adventures. These may yield some valuable resources and thus more than compensate for the initial investment of Presents and Gems.
More info when it becomes available!
Enjoy! And prepare!

Read Christmas Event Post 1 - Collectibles!

Read Christmas Event Post 3 - Advent Calendar!

Read Christmas Event Post 4 - Rarity Provision House!

Read Christmas Event Post 5 - Christmas Event Quests!

Read Christmas Event Post 6 - Christmas Treasure Searches!

Incoming! Christmas Event! Collectibles!

Winter may be cold weather-wise but it's hot with events! We barely left Halloween and already we should start preparing for Christmas Event ;)

I have been on the Test Server only once to check things out. I have tried several times ever since to access it but there have been problems after the maintenance (test server only) on the 19th of november. Lots of people cannot access it. As such this is likely to delay the testing and fine tuning of the Christmas Event. So, I would not be surprised if it started one or two weeks after the planned start date, which is the 12th of December. There are still a bunch of quests and tidbits I would like to check to give you a clear picture of what the event might bring for us. I will update as soon as get access to this info.

There is a lot to cover: special items at the Merchant Shop, X-mas quests, a new building called the Rarity Provision House, 5 new buffs (to be built in the Rarity Prov House), more Collectibles to be picked up and converted to Presents (the event coin) and the Advent Calendar.

Because there is a lot to cover I will break these tips for the coming Christmas Event into separate posts. I think this way it will be easier for people to search for stuff - and perhaps easier to read also.
You may want to read the first forum post about this event.


CHRISTMAS COLLECTIBLES
So what we will discuss here are the new collectibles showing up around our islands.
There are 3 new types of collectibles to be found:

         Candy Cane                     Christmas Bell                       Gingerbread


At least on the test server there were plenty of these around to be found each time a new lot of collectibles came about. Then in our Provision Houses we will be able to turn these collectibles into Presents (the Christmas Event coin).

Here's how it works:
25 Candy Cane + 25 Christmas Bell + 25 Gingerbread = 10 Presents


Simple huh? So expect a lot of trading of these new collectibles! Also, bear in mind that these values (taken from the test server) may differ from the actual ones we will be having during the event - just like the Golem damages changed when they became live in Halloween event.
The good thing about these new collectibles is that they are bigger and thus easier to spot than the usual ones. Looking through the map at some distance was enough to spot most of them quite quickly. Also, not sure if there will be a separate collect x-mas collectible quest associated with the showing up of these on our home islands - perhaps they will be bundled with the usual collectibles. We will have to wait and see!
Anyway, this is it for now! Enjoy!

Read Christmas Event Post 2 - Merchant Shop Items!

Read Christmas Event Post 3 - Advent Calendar!

Read Christmas Event Post 4 - Rarity Provision House!

Read Christmas Event Post 5 - Christmas Event Quests!

Read Christmas Event Post 6 - Christmas Treasure Searches!

Sunday 27 October 2013

Step-By-Step Round Block Guide with BHG/Grim-Reaper General for Island Of The Pirates Adventure

Hi everyone,

So we’ve got ourselves some Grim-Reapers for Halloween did we? I bet you want to put them to use – and perhaps try a few new things when going on adventures.

Maybe even trying those weird things called Round Blocks… If this is the case, this is the post you want to be reading. If not… well, maybe you will change your mind about Round Blocks by the time you finish reading this!

The aim of this post is to go on a step by step approach to the critical places in Island Of The Pirates, one of the adventures with best loot in the game. It’s an adventure that can be easy to do – with significant losses. Or quite tricky to get right – but with a substantial reduction in troop losses.

What we’re aiming here is at a first step in saving some troops by doing a couple of round blocks. Nothing too complicated that, hopefully will allow you to become familiar with them – and practice!

Let me start first by briefly explaining what a Round Block is. A Round Block is when you send a batch of troops with a normal general towards a camp. The aim is not to win the fight and conquer the camp but to make the fighting last for as long as possible.

While this happens another general will attack a leader camp and destroy it before the Round Block troops have time to finish. When this happens, all the camps that were under the leader camp’s influence will fall automatically.

Which means the camp the Round Block troops were attacking will fall also before their attack finishes.
Which means this camp is conquered with ZERO troop losses.

Pretty neat, huh?

So. Island Of The Pirates.
First things first. Check this guide.

Second things second. Check what generals you have. For a question of simplicity I’m going to assume you have a Grim-Reaper and two Normal Generals. The Grim-Reaper General (I’m going to call it BHG from now on as he is exactly the same as a BHG – and all the guides mention BHG’s rather than Grim-Reapers…) is going to be your main attack general. The other two normal generals will be your blocking generals.

It is important that you ALWAYS use normal generals to BLOCK. They fight slower than the special generals, thus making Blocking SAFER.

If you scroll down the guide you’ll see the advised setups for those of us with a BHG (colour coded blue) and normal generals (colour coded green):

One BATTLE HARDENED general
One
 NORMAL general, using two round blocks
·         Units needed, average: 457R 204S 191C 33LB (885 units)
·         Units needed, maximum: 508R 152S 47E 192C 33LB (932 units)
·         Units lost, minimum: 395R
·         Units lost, average: 456R
·         Units lost, maximum: 508R 5S

So you’ll need some Recruits, some Soldiers, some Cavalry and some Longbows BUT you will only lose Recruits if all goes according to plan. ;)

You have 2 days to do this adventure. This means you don’t have to have all the troops ready for it the moment you begin. You can leave some Recruits to be built as you use them up in the adventure.

So, first thing now is to send your troops to the adventure island as usual. When they arrive there they go to 1 of 4 places possible.

Garrison Position G1 (Camp 1)

In preparation for the first block, rearrange your generals, so that you have:
·         Position A: NORMAL general (needed for the optional block)
·         Position B: VETERAN general or BATTLE HARDENED general or ANY general
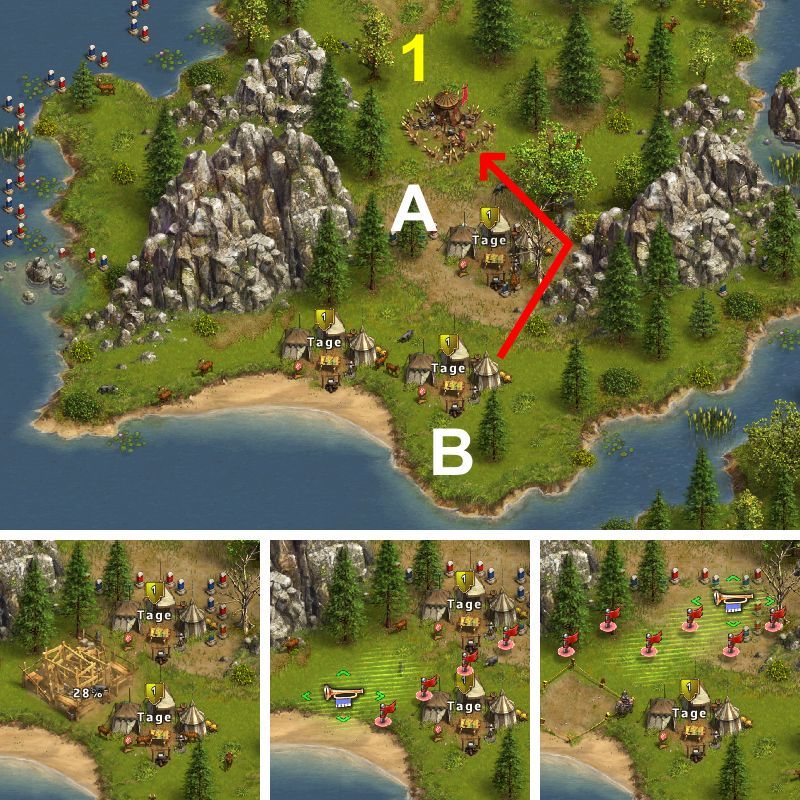


If you're lucky, your fast general has arrived in position B (this seems to be the case if you sent him first from your home island).
Also, if your fast general has arrived in position Z, you can very well use that position instead of position B as well.

Follow the insets in the image above for an idea on how to rearrange your generals in preparation for the block.
First inset shows general Y being sent home, second inset shows general X moving away from blocking position A.

You may have to send one general home in order to move the other two. If this is the case do two things:
-          Offload all troops from a normal general
-          Send the normal general home – NOT the BHG if you can, you’ll need it!

Now that you have some space, rearrange the garrison as per the pictures above. You want the normal general to be on top of the boundary bollards – and the BHG a bit lower, underneath it. Check and double check their location, relative to trees, rocks and other landmarks – you will want to have the garrisons in these positions spot on so that the Round Block works flawlessly!

After this is done you can destroy the first enemy camp:

From B to Camp 1) 100 Deckscrubbers, 50 Gunmen
ANY general: [12R 188C (7R - 9R - 11R)]
ANY general: [9R 1S 190C (7R - 9R - 9R)]
ANY general: [8R 1E 191C (7R - 8R - 8R)]
VETERAN general: [1S 249C (0 - 0 - 1S)]
VETERAN general: [1E 249C (-)]


Since we don’t have a Vet gen yet, we will go with

ANY general: [8R 1E 191C (7R - 8R - 8R)]

Since it’s the one that offers less losses. Because it says ANY general you can use either the BHG or one of the normal gens – both will work just the same.

Okay so now Camp 1 is destroyed – this means the path is free for the first round block in this adventure!

Garrison Position G1 (Camps 2-3, BLOCK)
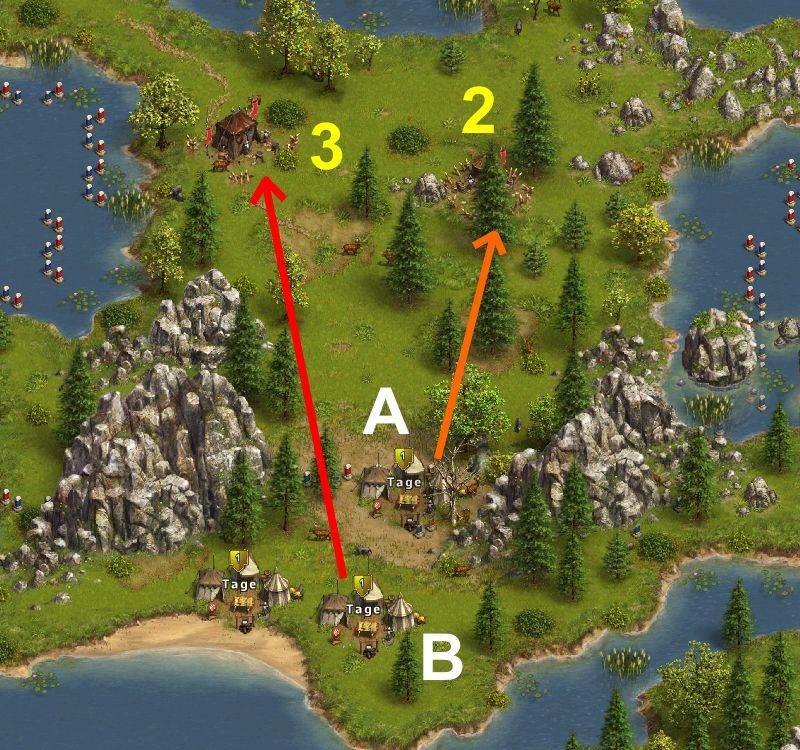


If you opt to use the block (always recommended), send both generals right after each other:


From A to Camp 2) 50 Caltrops, 100 Deckscrubbers
BLOCKING NORMAL general: [53S (-)] {5 - 6.6 - 10 rounds of fighting}
BLOCKING NORMAL general: [47E (-)] {5 - 6.6 - 11 rounds of fighting}

From B to Camp 3) 50 Caltrops, 100 Saberrattlers, 50 Gunmen
ANY general: [200R (69R - 81R - 94R)] {2 rounds of fighting}
ANY general: [91R 109S (69R - 79R - 91R 1S)] {2 rounds of fighting}
VETERAN general: [74R 168S (60R - 68R - 74R 1S)] {1 round of fighting}

This is the info given to the Round Block. So what do we need to do?

Simple. Since we still don’t have Elite Soldiers, we will load up our normal general with 53Soldiers. And since we don’t have a Vet general we will load up our BHG with 91R and 109S.

If you notice carefully Tage gives us quite a bit more info about the block. He says that the blocking attack lasts between 5 and 10 rounds of fighting – with the average being 6.6 rounds. And that the main fight, with the BHG, lasts only 2 rounds. This means the BHG fight will end much sooner than the fight with the normal (blocking) general.

And this is exactly what you want to happen.

Take a look at the picture displaying the attack. You see an orange one going to the camp on the right (Camp 2). And a red one going to the camp on the left (Camp3). The Orange arrow represents the blocking attack. The Red arrow represents the main attack, the BHG one.

And that's what you will need to do.

Now that all the correct troops have been assigned to each general click on the normal general garrison and attack the camp above and to the right (Camp 2).

As you click on the enemy camp you will hear a drumming sound, the sound of the attack being initiated.
While this sound plays click on the BHG’s garrison, press the attack button and move the mouse arrow to Camp 3. When the drumming sound finishes, click on the enemy camp – and hear the second drumming sound begin.

Don’t worry if there’s a second or two gap between the two sounds- this block has plenty of leeway for it not to matter.

Still it is important that the drumming sounds, that the attacks are done in quick sequence. Even if this block is an easy one, it is good practice to become fluent with the fluid sending of attacking troops since some Round Blocks are a lot tighter than this one – and you simply cannot waste time!

Okay, after this what will happen?

The normal gen will reach the camp on the right first - and attack it. When this camp is under attack, the influence zone it casts (red fog if you click on it before the attack) is switched off.

This means that the BHG can reach the camp on the left undisturbed. A few seconds after the normal general has started his attack the BHG will engage with his target camp. This is normal, it's what you want to happen.
Because the BHG fights faster than the normal general he will end his fight before the normal general does his.

Which means…

You will only lose troops on the BHG fight and still DEFEAT BOTH camps!

And that my friend, is how a Round Block takes place – saving you troops!

For Camp 4 it is easy enough:

 Garrison Position G2 (Camp 4)

Move your best general and one normal general to garrison position G2:
·         Position A: NORMAL general
·         Position B: VETERAN general or BATTLE HARDENED general (needed for the optional block)
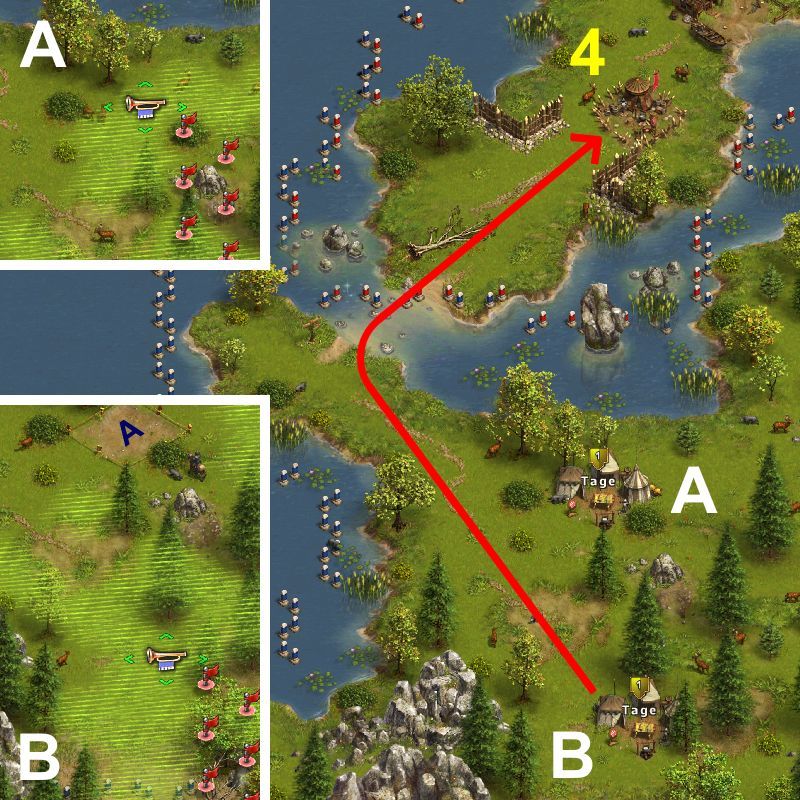


For the first attack, any general can be used:

Camp 4)
 60 Caltrops, 60 Deckscrubbers, 60 Knife Throwers
ANY general: [200R (40R - 48R - 56R)]
ANY general: [53R 147S (40R - 47R - 53R 1S)]


Just use the 53R and 147S setup with either of the two generals.

For Camps 5 and 6 you can once again do a Round Block, the second and last one possible in this adventure with only one BHG (and no Veteran General):

Garrison Position G2 (Camps 5-6, BLOCK)
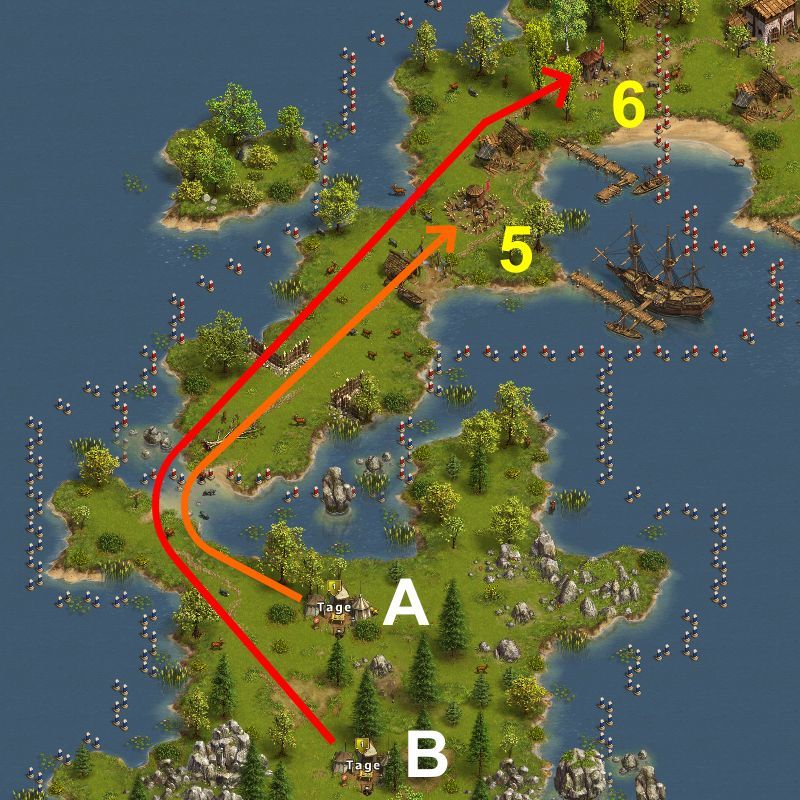


If you opt to use the block (recommended if you do have a fast general), send both generals right after each other:

From A to Camp 5) 40 Caltrops, 40 Saberrattlers, 40 Gunmen
BLOCKING NORMAL general: [54S (-)] {4 - 5.0 - 7 rounds of fighting}
BLOCKING NORMAL general: [47E (-)] {4 - 5.6 - 8 rounds of fighting}

From B to Camp 6) 80 Caltrops, 80 Saberrattlers, 2 Petty Officers
BATTLE HARDENED general: [50R 150S (36R - 43R - 50R 1S)] {1 round of fighting}
VETERAN general: [50R 155S (36R - 43R - 50R 1S)] {1 round of fighting}


Notice that you have to move the garrisons in order for this to work!

Just load up the normal general (above, position A) with 54S. And load up the BHG with 50R and 150S (position B).

Once more, make sure the garrisons are EXACTLY where the picture shows. If you didn’t get it right first time around, and they’re just one space to the left or right, up or down – DO IT AGAIN. Do not risk it. If you think it doesn’t matter – it does. A garrison that is placed a space away from the correct position will increase or decrease the travel distance to the enemy camp by a few seconds – and this might mean your Round Block will fail and you will lose troops needlessly.

Now that the generals are loaded up simply repeat the procedure described above. Send the normal general first against Camp 4. During the drumming sound do the same with the BHG so that, as soon as the sound ends, you start the attack on Camp 5.

Okay. Now that Camps 4 and 5 have disappeared we have Camps 7 and 8 – and a Trap!

Garrison Position G2 (Camps 7-8)
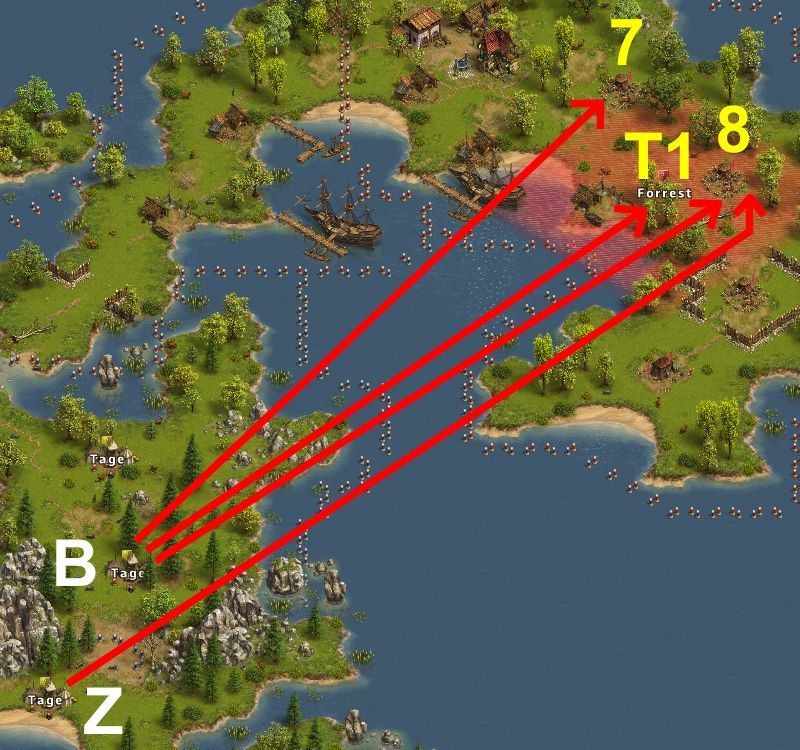


Camp 7) 90 Caltrops, 90 Saberrattlers
ANY general: [200R (36R - 49R - 62R)]
ANY general: [59R 141S (36R - 48R - 58R 1S)]
VETERAN general: [52R 175S (36R - 46R - 52R 1S)]

Trap T1) 100 Caltrops
ANY general: [127R (7R - 16R - 27R)]
ANY general: [23R 100S (7R - 16R - 23R 1S)]

Garrison position Z can be anywhere on the map. You can also use the general at garrison position A.
Note however that general A is needed for the last block, and you will have to wait 4 hours for him to recover in that case.

From Z to Camp 8) 30 Caltrops, 100 Deckscrubbers, 40 Gunmen
ANY general: [38R (38R)]

From B to Camp 8) 92-100 Deckscrubbers, 40 Gunmen
ANY general: [10R 190C (5R - 7R - 9R)]
ANY general: [8R 1S 191C (4R - 6R - 8R)]
ANY general: [7R 1E 192C (4R - 6R - 7R)]
VETERAN general: [1R 249C (-)]

What does this all mean?

Simple. First thing is to attack Camp 7 with:

ANY general: [59R 141S (36R - 48R - 58R 1S)]

After Camp 7 is down naturally we will want to go to Camp 8. But, in order to do this we must first remove the Trap hiding among the trees. Hover the mouse around that area and you will find. It is hard to spot and easy to miss – that’s why it’s called a Trap!

To remove the Trap we use 23R and 100S troops assigned to one of the generals - it doesn't matter which. You will need to move around with the mouse pointer until you find the trap in the trees. Then you simply attack it as usual.

After this is done we can go for Camp 8.

In my opinion the best option is to do two attacks on camp 8:

From Z to Camp 8) 30 Caltrops, 100 Deckscrubbers, 40 Gunmen
ANY general: [38R (38R)]

(a suicide attack of 38R)

And then:

ANY general: [8R 1S 191C (4R - 6R - 8R)]

the finishing attack.


This strategy will save you some troops.

And this is what we will need to do for the final attacks also.

Since we only have one BHG we cannot do a block on the final two camps. We need to take them down one at a time:

Garrison Position G2 (Camps 9-10, BLOCK)

Move your best general from position B to position D, and your battle hardened general to position C:
·         Position A: NORMAL general
·         Position C: BATTLE HARDENED general or VETERAN general (see below)
·         Position D: VETERAN general or BATTLE HARDENED general (see below)
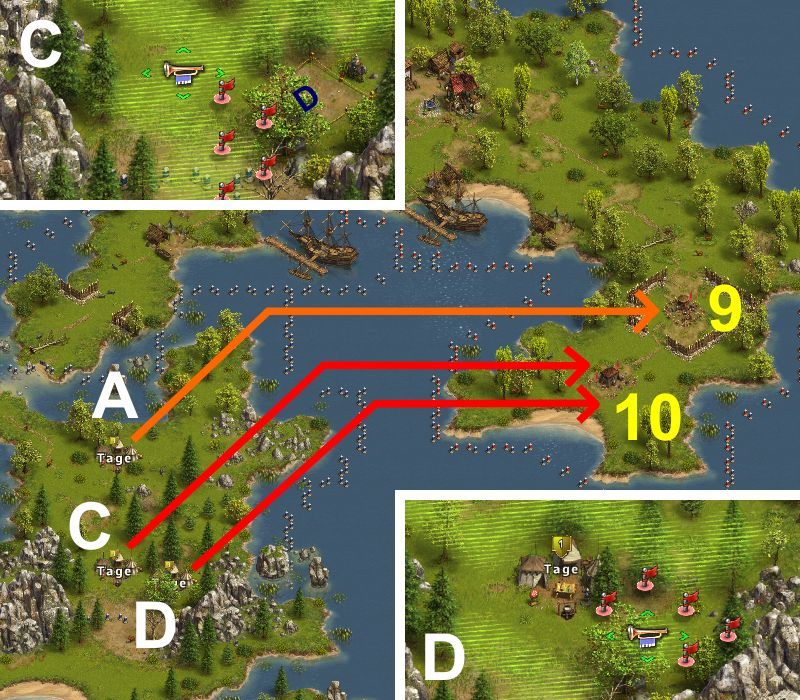

First of all, before doing anything else, make sure that you have indeed killed trap T1.
A huge failure would be the result if you haven't killed it before the last block.


If you opt not to use the block (recommended if you have maximum one battle hardened general and no veteran general):

From D
 to Camp 9) 100 Caltrops, 70 Saberrattlers
ANY general: [200R (31R - 41R - 56R)]
ANY general: [50R 150S (31R - 41R - 50R 1S)]
VETERAN general: [48R 168S (31R - 41R - 48R 1S)]

From A
 to Camp 10) 100 Saberrattlers, 70 Gunmen, 10 Petty Officers, 1 Crazy Cook
ANY general: [117R (117R)]

From D
 to Camp 10) 70 Gunmen, 10 Petty Officers, 1 Crazy Cook
ANY general: [15R 152C 33LB (10R - 13R - 15R)]
ANY general: [13R 1S 153C 33LB (10R - 12R - 13R)]
VETERAN general: [6R 1S 175C 68XB (5R - 6R - 6R)]

So we first attack Camp 9 with:


ANY general: [50R 150S (31R - 41R - 50R 1S)]

Following this we do a suicide wave on Camp 10:

ANY general: [117R (117R)]

And we wrap up with:

ANY general: [13R 1S 153C 33LB (10R - 12R - 13R)]

And you’re done!

You have two generals recovering from their battles but it does not matter. All you need to do is accept the rewards and return home. They will be sent back and when they arrive they will be fully recovered again.

All Images and garrison setups by Tage.

That’s it! Hope you have found helpful this step-by-step guide on how to use a BHG on Island Of The Pirates and do the two possible Round Blocks!

Happy adventuring!