Hi everyone,
So we’ve got
ourselves some Grim-Reapers for Halloween did we? I bet you want to put them to
use – and perhaps try a few new things when going on adventures.
Maybe even
trying those weird things called Round Blocks… If this is the case, this is the
post you want to be reading. If not… well, maybe you will change your mind
about Round Blocks by the time you finish reading this!
The aim of this
post is to go on a step by step approach to the critical places in Island Of
The Pirates, one of the adventures with best loot in the game. It’s an
adventure that can be easy to do – with significant losses. Or quite tricky to
get right – but with a substantial reduction in troop losses.
What we’re
aiming here is at a first step in saving some troops by doing a couple of round
blocks. Nothing too complicated that, hopefully will allow you to become
familiar with them – and practice!
Let me start
first by briefly explaining what a Round Block is. A Round Block is when you
send a batch of troops with a normal general towards a camp. The aim is not to
win the fight and conquer the camp but to make the fighting last for as long as
possible.
While this
happens another general will attack a leader camp and destroy it before the
Round Block troops have time to finish. When this happens, all the camps that
were under the leader camp’s influence will fall automatically.
Which means the camp
the Round Block troops were attacking will fall also before their attack
finishes.
Which means this
camp is conquered with ZERO troop losses.
Pretty neat,
huh?
So. Island Of
The Pirates.
First things
first. Check this guide.
Second things
second. Check what generals you have. For a question of simplicity I’m going to
assume you have a Grim-Reaper and two Normal Generals. The Grim-Reaper General
(I’m going to call it BHG from now on as he is exactly the same as a BHG – and all
the guides mention BHG’s rather than Grim-Reapers…) is going to be your main
attack general. The other two normal generals will be your blocking generals.
It is important
that you ALWAYS use normal generals to BLOCK. They fight slower than the
special generals, thus making Blocking SAFER.
If you scroll
down the guide you’ll see the advised setups for those of us with a BHG (colour
coded blue) and normal generals (colour coded green):
One BATTLE HARDENED general
One NORMAL general, using two round blocks
One NORMAL general, using two round blocks
·
Units needed, average: 457R 204S 191C 33LB (885 units)
·
Units needed, maximum: 508R 152S 47E 192C 33LB (932
units)
·
Units lost, minimum: 395R
·
Units lost, average: 456R
·
Units lost, maximum: 508R 5S
So you’ll need
some Recruits, some Soldiers, some Cavalry and some Longbows BUT you will only
lose Recruits if all goes according to plan. ;)
You have 2 days
to do this adventure. This means you don’t have to have all the troops ready
for it the moment you begin. You can leave some Recruits to be built as you use
them up in the adventure.
So, first thing
now is to send your troops to the adventure island as usual. When they arrive
there they go to 1 of 4 places possible.
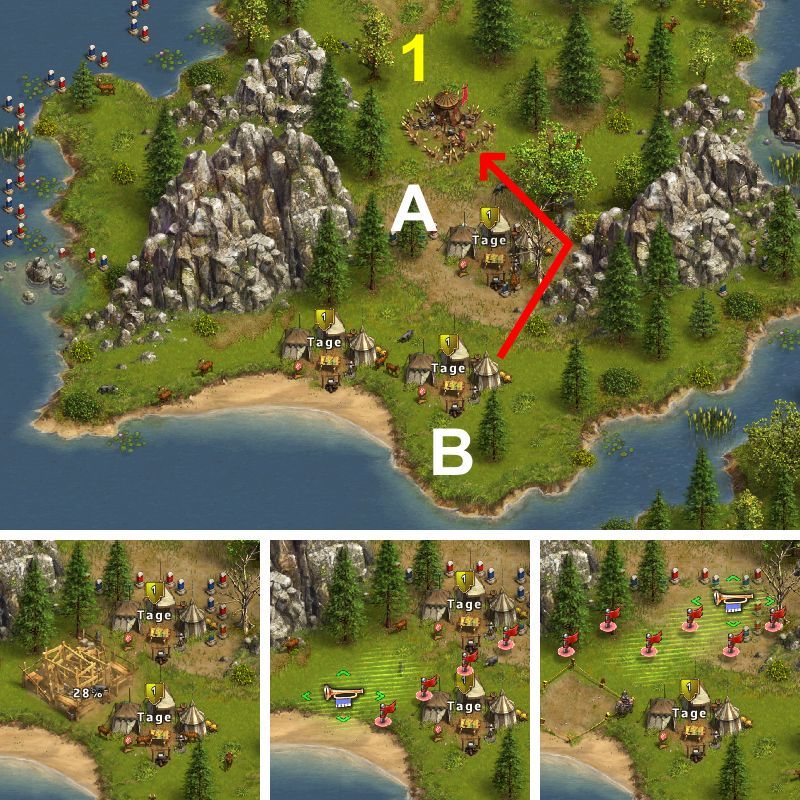
Garrison Position G1 (Camp 1)
In preparation for the first block, rearrange your generals, so that you have:
In preparation for the first block, rearrange your generals, so that you have:
·
Position A: NORMAL general (needed for the
optional block)
·
Position B: VETERAN general or BATTLE HARDENED
general or ANY general
If you're lucky, your fast general has arrived in position B (this seems to be the case if you sent him first from your home island).
Also, if your fast general has arrived in position Z, you can very well use that position instead of position B as well.
Follow the insets in the image above for an idea on how to rearrange your generals in preparation for the block.
First inset shows general Y being sent home, second inset shows general X moving away from blocking position A.
You may have to
send one general home in order to move the other two. If this is the case do
two things:
-
Offload
all troops from a normal general
-
Send
the normal general home – NOT the BHG if you can, you’ll need it!
Now that you
have some space, rearrange the garrison as per the pictures above. You want the
normal general to be on top of the boundary bollards – and the BHG a bit lower,
underneath it. Check and double check their location, relative to trees, rocks
and other landmarks – you will want to have the garrisons in these positions
spot on so that the Round Block works flawlessly!
After this is
done you can destroy the first enemy camp:
From B to Camp 1) 100
Deckscrubbers, 50 Gunmen
ANY general: [12R 188C (7R - 9R - 11R)]
ANY general: [9R 1S 190C (7R - 9R - 9R)]
ANY general: [8R 1E 191C (7R - 8R - 8R)]
VETERAN general: [1S 249C (0 - 0 - 1S)]
VETERAN general: [1E 249C (-)]
ANY general: [12R 188C (7R - 9R - 11R)]
ANY general: [9R 1S 190C (7R - 9R - 9R)]
ANY general: [8R 1E 191C (7R - 8R - 8R)]
VETERAN general: [1S 249C (0 - 0 - 1S)]
VETERAN general: [1E 249C (-)]
Since we don’t
have a Vet gen yet, we will go with
ANY general: [8R 1E 191C (7R -
8R - 8R)]
Since it’s the
one that offers less losses. Because it says ANY general you can use either the
BHG or one of the normal gens – both will work just the same.
Okay so now Camp
1 is destroyed – this means the path is free for the first round block in this
adventure!
Garrison Position G1 (Camps 2-3, BLOCK)
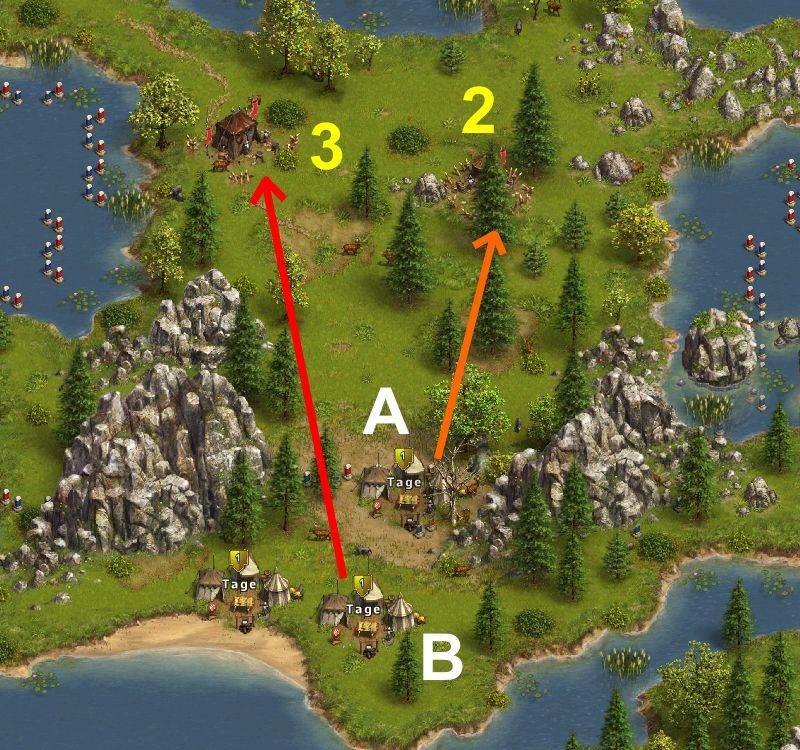
If you opt to use the block (always recommended), send both generals right after each other:
From A to Camp 2) 50 Caltrops, 100 Deckscrubbers
BLOCKING NORMAL general: [53S (-)] {5 - 6.6 - 10 rounds of fighting}
BLOCKING NORMAL general: [47E (-)] {5 - 6.6 - 11 rounds of fighting}
From B to Camp 3) 50 Caltrops, 100 Saberrattlers, 50 Gunmen
ANY general: [200R (69R - 81R - 94R)] {2 rounds of fighting}
ANY general: [91R 109S (69R - 79R - 91R 1S)] {2 rounds of fighting}
VETERAN general: [74R 168S (60R - 68R - 74R 1S)] {1 round of fighting}
This is the info
given to the Round Block. So what do we need to do?
Simple. Since we
still don’t have Elite Soldiers, we will load up our normal general with
53Soldiers. And since we don’t have a Vet general we will load up our BHG with
91R and 109S.
If you notice
carefully Tage gives us quite a bit more info about the block. He says that the
blocking attack lasts between 5 and 10 rounds of fighting – with the average
being 6.6 rounds. And that the main fight, with the BHG, lasts only 2 rounds.
This means the BHG fight will end much sooner than the fight with the normal
(blocking) general.
And this is
exactly what you want to happen.
Take a look at
the picture displaying the attack. You see an orange one going to the camp on
the right (Camp 2). And a red one going to the camp on the left (Camp3). The
Orange arrow represents the blocking attack. The Red arrow represents the main
attack, the BHG one.
And that's what
you will need to do.
Now that all the
correct troops have been assigned to each general click on the normal general
garrison and attack the camp above and to the right (Camp 2).
As you click on
the enemy camp you will hear a drumming sound, the sound of the attack being
initiated.
While this sound
plays click on the BHG’s garrison, press the attack button and move the mouse
arrow to Camp 3. When the drumming sound finishes, click on the enemy camp –
and hear the second drumming sound begin.
Don’t worry if
there’s a second or two gap between the two sounds- this block has plenty of
leeway for it not to matter.
Still it is
important that the drumming sounds, that the attacks are done in quick
sequence. Even if this block is an easy one, it is good practice to become
fluent with the fluid sending of attacking troops since some Round Blocks are a
lot tighter than this one – and you simply cannot waste time!
Okay, after this
what will happen?
The normal gen
will reach the camp on the right first - and attack it. When this camp is under
attack, the influence zone it casts (red fog if you click on it before the
attack) is switched off.
This means that
the BHG can reach the camp on the left undisturbed. A few seconds after the normal
general has started his attack the BHG will engage with his target camp. This
is normal, it's what you want to happen.
Because the BHG
fights faster than the normal general he will end his fight before the normal
general does his.
Which means…
You will only
lose troops on the BHG fight and still DEFEAT BOTH camps!
And that my
friend, is how a Round Block takes place – saving you troops!
For Camp 4 it is
easy enough:
Garrison Position G2 (Camp 4)
Move your best general and one normal general to garrison position G2:
Move your best general and one normal general to garrison position G2:
·
Position A: NORMAL
general
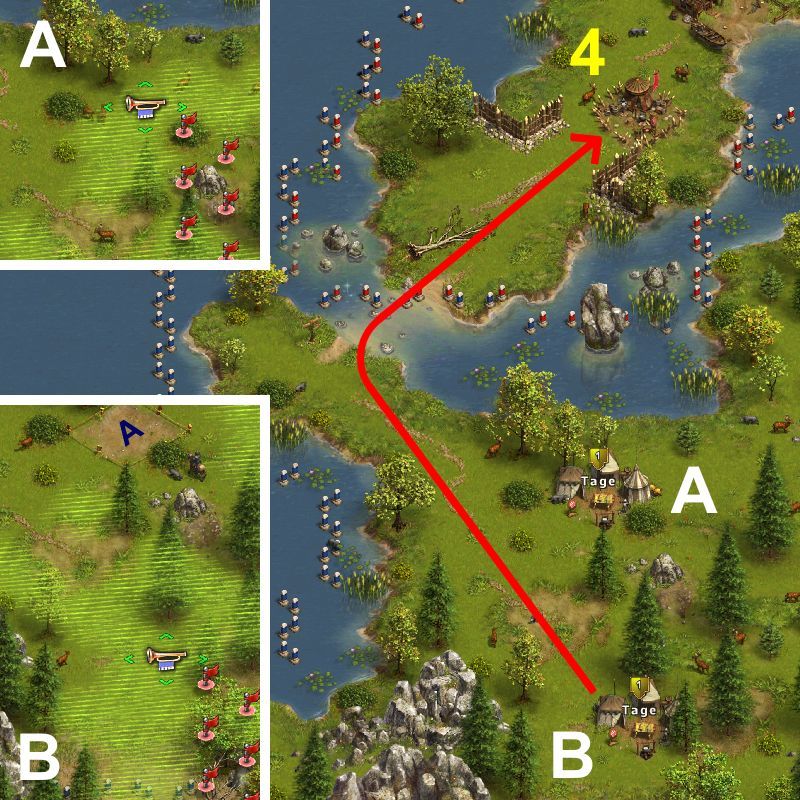
For the first attack, any general can be used:
Camp 4) 60 Caltrops, 60 Deckscrubbers, 60 Knife Throwers
ANY general: [200R (40R - 48R - 56R)]
ANY general: [53R 147S (40R - 47R - 53R 1S)]
Just use the 53R
and 147S setup with either of the two generals.
For Camps 5 and
6 you can once again do a Round Block, the second and last one possible in this
adventure with only one BHG (and no Veteran General):
Garrison Position G2 (Camps 5-6, BLOCK)

If you opt to use the block (recommended if you do have a fast general), send both generals right after each other:
From A to Camp 5) 40 Caltrops, 40 Saberrattlers, 40 Gunmen
BLOCKING NORMAL general: [54S (-)] {4 - 5.0 - 7 rounds of fighting}
BLOCKING NORMAL general: [47E (-)] {4 - 5.6 - 8 rounds of fighting}
From B to Camp 6) 80 Caltrops, 80 Saberrattlers, 2 Petty Officers
BATTLE HARDENED general: [50R 150S (36R - 43R - 50R 1S)] {1 round of fighting}
VETERAN general: [50R 155S (36R - 43R - 50R 1S)] {1 round of fighting}
Notice that you
have to move the garrisons in order for this to work!
Just load up the
normal general (above, position A) with 54S. And load up the BHG with 50R and
150S (position B).
Once more, make
sure the garrisons are EXACTLY where the picture shows. If you didn’t get it
right first time around, and they’re just one space to the left or right, up or
down – DO IT AGAIN. Do not risk it. If you think it doesn’t matter – it does. A
garrison that is placed a space away from the correct position will increase or
decrease the travel distance to the enemy camp by a few seconds – and this
might mean your Round Block will fail and you will lose troops needlessly.
Now that the
generals are loaded up simply repeat the procedure described above. Send the
normal general first against Camp 4. During the drumming sound do the same with
the BHG so that, as soon as the sound ends, you start the attack on Camp 5.
Okay. Now that
Camps 4 and 5 have disappeared we have Camps 7 and 8 – and a Trap!
Garrison Position G2 (Camps 7-8)
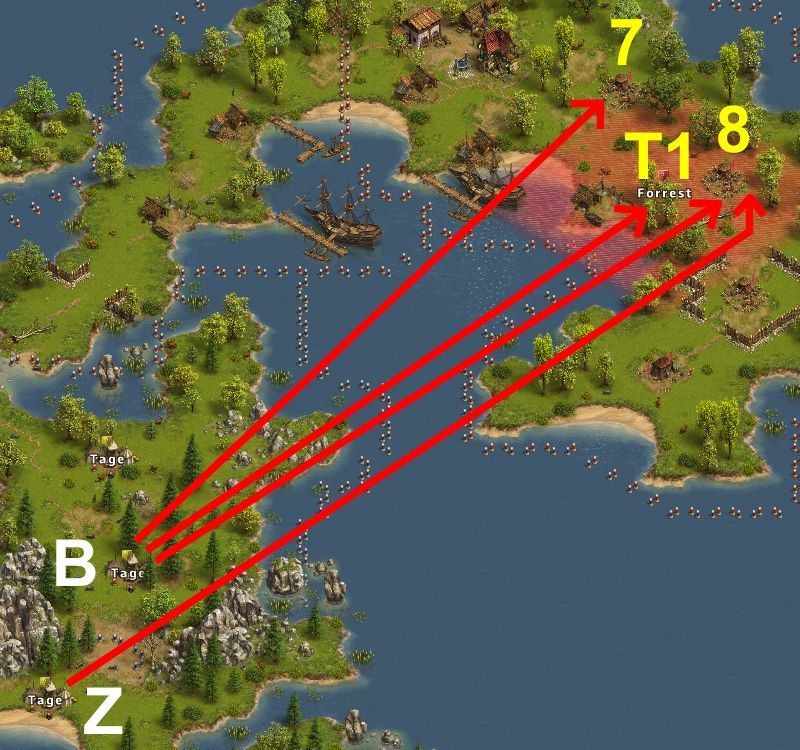
Camp 7) 90 Caltrops, 90 Saberrattlers
ANY general: [200R (36R - 49R - 62R)]
ANY general: [59R 141S (36R - 48R - 58R 1S)]
VETERAN general: [52R 175S (36R - 46R - 52R 1S)]
Trap T1) 100 Caltrops
ANY general: [127R (7R - 16R - 27R)]
ANY general: [23R 100S (7R - 16R - 23R 1S)]
Garrison position Z can be anywhere on the map. You can also use the general at garrison position A.
Note however that general A is needed for the last block, and you will have to wait 4 hours for him to recover in that case.
From Z to Camp 8) 30 Caltrops, 100 Deckscrubbers, 40 Gunmen
ANY general: [38R (38R)]
From B to Camp 8) 92-100 Deckscrubbers, 40 Gunmen
ANY general: [10R 190C (5R - 7R - 9R)]
ANY general: [8R 1S 191C (4R - 6R - 8R)]
ANY general: [7R 1E 192C (4R - 6R - 7R)]
VETERAN general: [1R 249C (-)]
What does this
all mean?
Simple. First
thing is to attack Camp 7 with:
ANY general: [59R 141S (36R -
48R - 58R 1S)]
After Camp 7 is
down naturally we will want to go to Camp 8. But, in order to do this we must
first remove the Trap hiding among the trees. Hover the mouse around that area
and you will find. It is hard to spot and easy to miss – that’s why it’s called
a Trap!
To remove the
Trap we use 23R and 100S troops assigned to one of the generals - it doesn't
matter which. You will need to move around with the mouse pointer until you
find the trap in the trees. Then you simply attack it as usual.
After this is
done we can go for Camp 8.
In my opinion
the best option is to do two attacks on camp 8:
From Z to Camp 8) 30
Caltrops, 100 Deckscrubbers, 40 Gunmen
ANY general: [38R (38R)]
ANY general: [38R (38R)]
(a suicide
attack of 38R)
And then:
ANY general: [8R 1S 191C (4R -
6R - 8R)]
the finishing attack.
the finishing attack.
This strategy will
save you some troops.
And this is what
we will need to do for the final attacks also.
Since we only
have one BHG we cannot do a block on the final two camps. We need to take them
down one at a time:
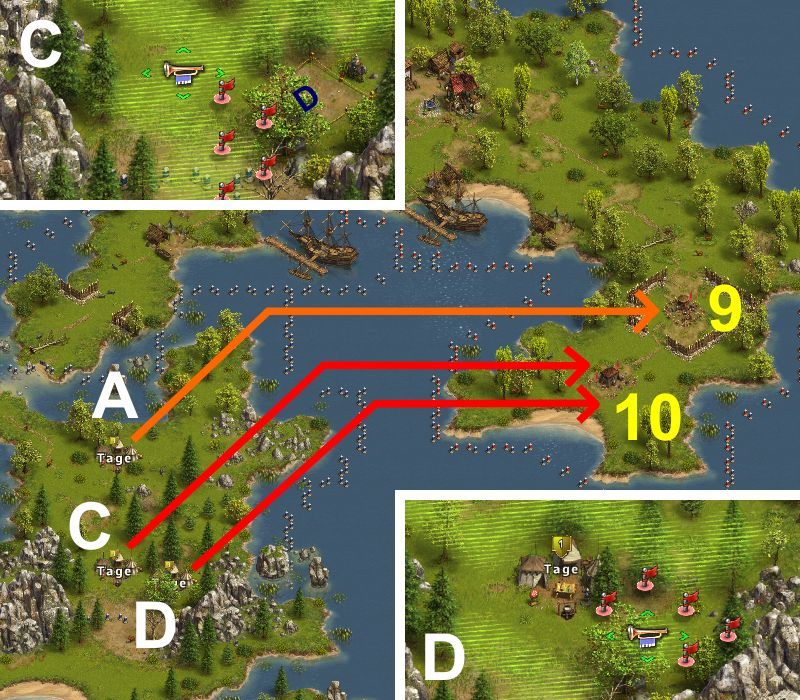
Garrison Position G2 (Camps 9-10, BLOCK)
Move your best general from position B to position D, and your battle hardened general to position C:
Move your best general from position B to position D, and your battle hardened general to position C:
·
Position A: NORMAL
general
·
Position C: BATTLE HARDENED
general or VETERAN general (see below)
·
Position D: VETERAN general or BATTLE HARDENED
general (see below)
First of all, before doing anything else, make sure that you have indeed killed trap T1.
A huge failure would be the result if you haven't killed it before the last block.
If you opt not to use the block (recommended if you have maximum one battle hardened general and no veteran general):
From D to Camp 9) 100 Caltrops, 70 Saberrattlers
ANY general: [200R (31R - 41R - 56R)]
ANY general: [50R 150S (31R - 41R - 50R 1S)]
VETERAN general: [48R 168S (31R - 41R - 48R 1S)]
From A to Camp 10) 100 Saberrattlers, 70 Gunmen, 10 Petty Officers, 1 Crazy Cook
ANY general: [117R (117R)]
From D to Camp 10) 70 Gunmen, 10 Petty Officers, 1 Crazy Cook
ANY general: [15R 152C 33LB (10R - 13R - 15R)]
ANY general: [13R 1S 153C 33LB (10R - 12R - 13R)]
VETERAN general: [6R 1S 175C 68XB (5R - 6R - 6R)]
So we first attack Camp 9 with:
Following this we
do a suicide wave on Camp 10:
ANY general: [117R (117R)]
And we wrap up
with:
ANY
general: [13R 1S 153C 33LB
(10R - 12R - 13R)]
And you’re done!
You have two
generals recovering from their battles but it does not matter. All you need to
do is accept the rewards and return home. They will be sent back and when they
arrive they will be fully recovered again.
All Images and garrison setups by Tage.
All Images and garrison setups by Tage.
That’s it! Hope
you have found helpful this step-by-step guide on how to use a BHG on Island Of
The Pirates and do the two possible Round Blocks!
Happy adventuring!